Why I Built a Home Security Lab (And What’s Actually In It)
Part 1 of the Home Security Lab series.
Most people who write about home labs are hobbyists who got into it for the fun of running their own services. That’s a perfectly good reason. Mine was different. I spend my working life evaluating security tools, responding to incidents, and building defensive architecture for organisations that can’t afford to get it wrong. After enough years of that, you start to notice something uncomfortable: almost nobody applies that same thinking to their own home network. Including, for a long time, me.
So I built a home security lab to fix that — a self-hosted security and monitoring stack running on hardware I own, in my own house, defending my own family’s data. Not a toy. A scaled-down version of the same layered-defence model I’d stand behind professionally. This article is the overview: what’s in it, why each piece is there, and what I learned building it. The rest of this series goes deep on the individual components.
A note before we start: I’m not going to publish IP addresses, hostnames, passwords, or anything else that would help someone attack the actual machine. What I will share is the architecture and the reasoning, because that’s the part you can learn from and adapt. If you take one thing from this series, let it be the thinking, not a copy-paste config.
Why bother at all?
The honest answer is that the threat model for a home network has changed, and most home setups haven’t kept up.
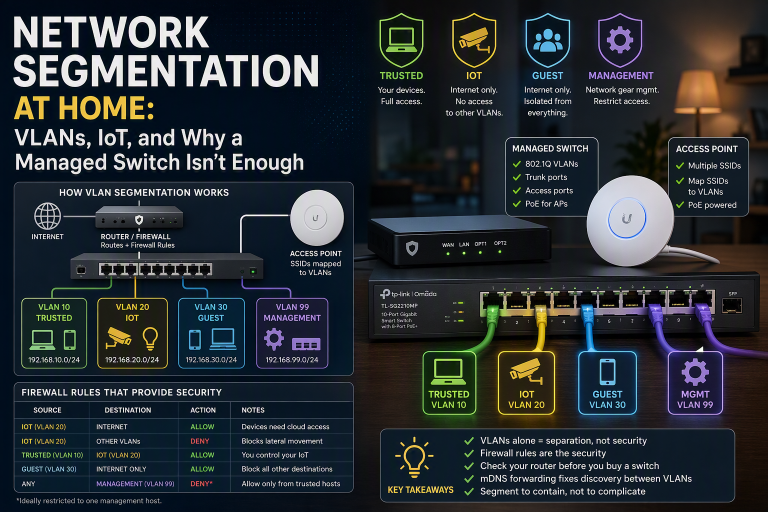
Your router is running firmware the manufacturer stopped patching years ago. Your DNS queries — every site you visit, resolved in plaintext — go to your ISP or to Google. Your passwords live in a browser or, worse, in a notebook. Your smart TV, your kid’s tablet, and a half-forgotten IoT plug all sit on the same flat network as the laptop you do your banking on. None of this is catastrophic on its own. Together, it’s a soft target.
I wanted three things: to remove my dependence on third-party cloud services for core functions like DNS and password storage, to actually see what was happening on my network, and to get a high-fidelity alert on my phone if something was wrong. Cloud-free, observable, and alerted. Everything below serves one of those goals.
There’s also a professional dimension I’ll be upfront about. Running this stack keeps my hands dirty. It’s one thing to read a vendor’s datasheet about an intrusion detection system; it’s another to run one for six months and watch what it actually flags. That hands-on grounding is the thing I bring to every review on this site, and the lab is where a lot of it comes from.
What I wanted the lab to do
Before the component list, the rules that shaped it. These matter more than the specific tools, because tools change and principles don’t.
Self-hosted by default. No third-party cloud for DNS, password storage, monitoring, or alerting. If I can run it myself, I do.
Layered detection. Perimeter, network, endpoint, deception, and correlation — in that order. No single layer is trusted to be enough.
Active deception. Fake services that no legitimate user should ever touch. Any connection to them is suspicious by definition — which makes their alerts almost noise-free.
Encryption at rest for what matters. File-level encryption on the genuinely sensitive data — VPN keys, the password vault, captured credentials — with keys stored separately.
Verify the controls actually work. Not “is the service running” but “is the control doing its job.” A monitoring stack that only checks uptime is lying to you.
Alerts reach a human. High-severity findings hit my phone. If an alert just sits in a dashboard nobody looks at, it doesn’t exist.
That fifth one — verify the controls actually work — is the principle that separates a security practitioner’s setup from an enthusiast’s. I’ll come back to it.
The hardware (deliberately modest)
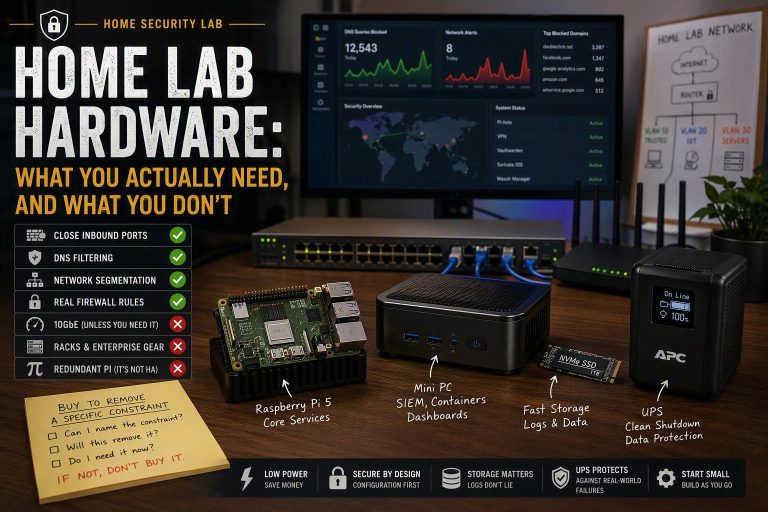
Here’s the part that surprises people: the whole core runs on a Raspberry Pi 4. A single-board computer that costs less than a nice dinner out is doing the DNS filtering, the VPN, the password vault, the network intrusion detection, the honeypots, and the encryption-at-rest — for the entire household.
The heavier lifting — the SIEM that correlates everything, plus the metrics and dashboards — runs on an existing Windows desktop I already had, because that workload genuinely needs more memory and storage than a Pi should be asked to provide. A second Windows machine is along for the ride as a monitored endpoint.
This is the first lesson of the series, and it’s a strategic one: a serious home security posture is not a hardware spending problem. The money, when there is any, goes into storage for keeping data and logs — not into exotic appliances. Almost everything here is open-source software running on cheap, ordinary kit. I’ll cover the specific hardware (and the one upgrade I’d recommend) in the individual build articles.
The eight layers, walked through
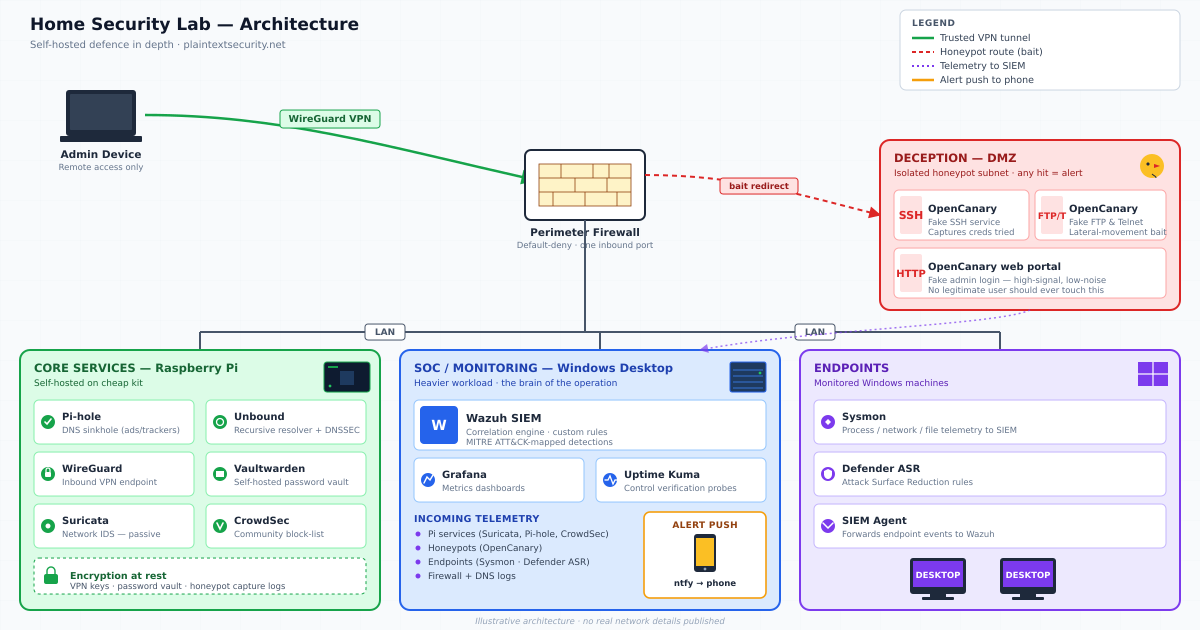
The stack is organised as eight layers, sequenced by how an actual threat would travel through the environment — from the internet, inward, to your data. Each layer is independently testable. Here’s the whole model at a glance, then the reasoning.
| Layer | Purpose | What’s doing the work |
|---|---|---|
| 1. Perimeter | Shrink the internet-facing surface to the bare minimum | Router + host firewall, default-deny, one inbound port |
| 2. DNS filtering + DNSSEC | Block bad domains, drop third-party resolvers | Pi-hole + Unbound, recursive resolution |
| 3. Network detection | Spot malicious traffic, block known-bad IPs | Suricata IDS + CrowdSec |
| 4. Endpoint telemetry | Limit what a bad process can do, capture what it tried | Sysmon + Defender ASR + SIEM agents |
| 5. Data protection | Make sensitive files unreadable if hardware is stolen | File-level encryption, trusted TLS certs |
| 6. Deception | Create monitored bait only an intruder would touch | Honeypots (fake SSH/FTP/Telnet/HTTP) |
| 7. SIEM correlation | Pull every layer into one pane with named detections | Wazuh, custom rules, MITRE ATT&CK mapping |
| 8. Alerting | Make sure a human finds out, and monitor the monitoring | Push alerts to phone, availability monitoring |
Layer 1 — Perimeter. Exactly one port is open to the internet: the VPN. That’s it. UPnP and NAT-PMP are disabled so that no device — or piece of malware — can quietly punch its own hole through the firewall. This is the single highest-value change most people could make, and it costs nothing.
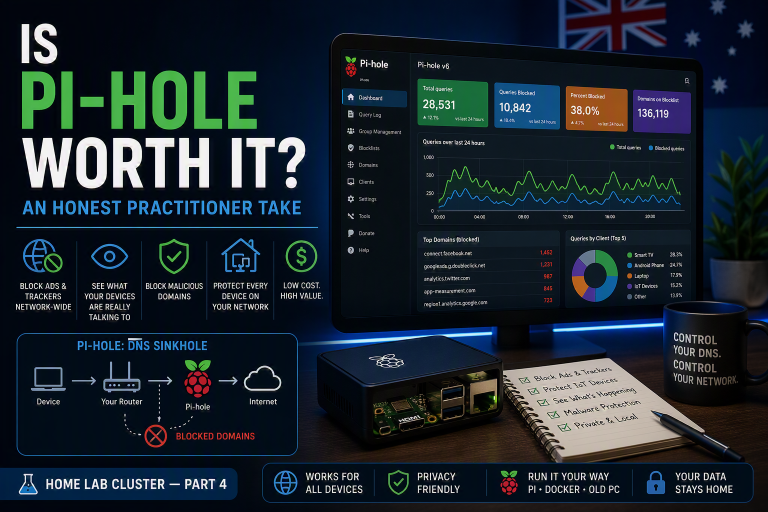
Layer 2 — DNS. Every device on the network resolves through a local DNS filter that blocks tens of thousands of ad and tracker domains, then resolves the rest recursively against the root servers rather than handing my browsing history to a third-party resolver. DNSSEC is enforced, so forged DNS responses get refused. This is the layer with the best effort-to-payoff ratio for a normal household, and the dedicated article on it is the one I’d point a beginner to first.
Layer 3 — Network detection. A passive intrusion detection system watches traffic against around fifty thousand threat signatures and ships anything interesting to the SIEM. Alongside it, a collaborative IP-reputation tool blocks hosts the wider community has already flagged as malicious. Detect on one side, block on the other.
Layer 4 — Endpoint. The Windows machines run deep system-level telemetry — every process launch, network connection, and file event — feeding the SIEM. Attack Surface Reduction rules block common attack techniques like credential theft outright. This is where “see what’s happening” gets real: you’d be amazed what ordinary software does in the background once you can actually watch it.
Layer 5 — Data protection. The genuinely sensitive directories — VPN private keys, the password vault, and the honeypot logs (which capture attackers’ credential guesses in plaintext) — are encrypted at the file level, with the keys held separately from the data. Everything internet-reachable uses a proper trusted certificate that renews itself, so there are no browser warnings to click through and become numb to.
Layer 6 — Deception. This is my favourite layer, because it’s the one that produces almost zero false alarms. I run fake SSH, FTP, Telnet, and web services that look real but have no legitimate purpose. Nobody on my network has any reason to connect to them. So when something does — and the SSH honeypot dutifully records the username and password it tried — I know with near-certainty that I’m looking at something that shouldn’t be there. High signal, almost no noise.
Layer 7 — SIEM correlation. All of it — endpoint telemetry, network alerts, honeypot hits, system logs — flows into one place that correlates events and applies named detection rules, each mapped to the MITRE ATT&CK framework so I can speak about what technique an event represents, not just “something happened.” This is the brain of the operation.
Layer 8 — Alerting. None of the above matters if I don’t find out. High-severity events push straight to my phone. A separate availability monitor watches every critical service and screams (politely, via the same notification channel) if anything goes down.
The part most home labs skip: verifying the controls work
Here’s the distinction I promised to come back to. Most monitoring tells you a service is running. That is not the same as the service doing its job.
So there’s a separate plane on top of the eight layers whose only job is to answer “are the controls actually working?” It continuously probes the things that fail silently. It fires a deliberately broken DNS lookup to confirm DNSSEC is still rejecting forgeries — because a misconfiguration could disable that protection without anything appearing to break. It checks that the encryption mounts are not just present but readable by the exact account that needs them. It confirms the firewall is up and the intrusion detection is actually inspecting packets.
I learned why this matters the hard way. Early on, a single missing option in one configuration file silently stopped my honeypot logs from being read by the system that’s supposed to alert on them. Everything looked fine. The service was running. But for about half an hour, the deception layer was blind, and nothing told me. The control-verification probe I built afterward exists specifically so that exact failure can never go unnoticed again. That’s the practitioner instinct in a nutshell: assume your controls will fail quietly, and build the thing that catches it when they do.
What this cost, and what it’s worth
All in, the hardware is modest and the software is free. The ongoing cost is a few dollars a month of electricity and a domain name. The real investment is time — the building, the breaking, the documenting.
Is it worth it for a normal household? Honestly: not all of it. You do not need honeypots and a SIEM to be meaningfully safer than 95% of home networks. If you do nothing else, lock your perimeter down to one port, put a DNS filter in front of every device, and use a real password manager. That’s the 80/20, and most of it is free.
But the deeper stack earns its keep in a way that’s hard to quantify. It means that when I tell you a particular VPN’s threat model doesn’t match what most people actually need, or that you’re better off with a managed password manager than self-hosting one, I’m not reciting marketing copy. I’ve run both. I know where the sharp edges are. That’s the entire point of this site, and this lab is where it comes from.
Where this series goes next
Each of these gets its own deep-dive, written to stand alone but designed to connect:
- Self-hosting your password manager with Vaultwarden — and the honest case for why most people should use a managed option instead.
- Self-hosting a VPN with WireGuard — and the critical difference between a personal VPN and a commercial privacy one.
- Network-wide ad and tracker blocking with Pi-hole + Unbound — the single best weekend project on this list.
- Catching attackers with honeypots — the highest-signal, lowest-noise detection you can run at home.
- Monitoring it all with Wazuh, Grafana, and Uptime Kuma — turning a pile of services into a single pane of glass.
If you’re new to all this, start with the Pi-hole article — it’s the most useful, the most beginner-friendly, and the fastest path to feeling the difference. If you’re here for the security depth, the honeypot piece is where it gets interesting.
This article contains affiliate links. If you purchase through them, I may earn a commission at no extra cost to you. Affiliate relationships do not influence my recommendations — see my Affiliate Disclosure for full details.